Explore Multi-Factor Authentication (MFA) in Ruby on Rails with Devise Two-Factor
Security has become one of the most important concerns for modern web applications. As cyberattacks evolve, merely relying on passwords is no longer enough. Multi-Factor Authentication (MFA) adds an extra layer of protection, significantly improving your application’s security. In this blog, we’ll guide you step-by-step through adding MFA to your Ruby on Rails application using the devise-two-factor gem.
By the end of this blog, you will have implemented MFA in your Rails app, enhancing security and user protection. Let's dive into how to accomplish this.
Why You Need Multi-Factor Authentication (MFA)
MFA is a security system that requires multiple forms of verification before granting access to an account. Typically, these verifications involve something the user knows (password) and something the user possesses (OTP sent via phone). By requiring more than one authentication factor, MFA reduces the risk of compromised accounts due to weak or stolen passwords.
- Significantly increase the trustworthiness of your application.
- Protect against phishing attacks and password theft.
- Ensure compliance with security standards.
Rails provides many libraries to add MFA, with devise-two-factor being a reliable solution built on the widely used Devise authentication system.
Step-by-Step Example: Adding MFA to Your Rails App
Step 1: Setting Up devise and devise-two-factor
First, let’s make sure you have Devise set up in your Rails application. If you haven’t yet done so, add the following gems to your Gemfile:
    # Gemfile
    gem 'devise'
    gem 'devise-two-factor'
    gem 'rotp' # Required for generating TOTP codes
Run bundle install to install the gems:
bundle install
If you haven’t set up Devise yet, run:
rails generate devise:install
Now, create a Devise User model:
    rails generate devise User
    rails db:migrate
This creates a basic user authentication system. Next, we will enable two-factor authentication.
Step 2: Generate devise-two-factor Migration
To add the necessary columns for two-factor authentication to the User model, run:
rails generate devise_two_factor User
This generates a migration that includes fields like encrypted_otp_secret, encrypted_otp_secret_iv, and otp_required_for_login.
Run the migration:
rails db:migrate
Step 3: Customising Chunking with chunk_time_interval
Open the User model (app/models/user.rb) and enable two-factor authentication:
    class User < ApplicationRecord
    devise :database_authenticatable, :registerable,
            :recoverable, :rememberable, :validatable,
            :two_factor_authenticatable,:two_factor_backupable,  otp_backup_code_length: 8,
            :otp_number_of_backup_codes: 10

    def generate_otp_backup_codes!
        codes = []
        number_of_codes = self.class.otp_number_of_backup_codes
        code_length = self.class.otp_backup_code_length

        number_of_codes.times do
        codes << SecureRandom.hex(code_length / 2)
        end
        hashed_codes = codes.map { |code| Devise::Encryptor.digest(self.class, code) }
        update!(otp_backup_codes: hashed_codes)
        codes
    end

    def invalidate_otp_backup_code!(code)
        codes = self.otp_backup_codes || []

        codes.each do |backup_code|
        next unless Devise::Encryptor.compare(self.class, backup_code, code)

        codes.delete(backup_code)
        update!(otp_backup_codes: codes)
        return true
        end

        false
    end
    end
The two_factor_authenticatable module ensures that users are prompted for an OTP.
Step 4: Managing Columns and Data Retention Policy
You need to add custom routes to manage enabling two-factor authentication. Open config/routes.rb and add the following:
    Rails.application.routes.draw do
    get 'home/index'
    post 'users/enable_otp'
    post 'users/disable_otp'

    devise_for :users

    root to: "home#index", via: [:get, :post]
    end
This route enables users to manage their two-factor settings through a dedicated page.
Step 5: Create UsersController
Create a new controller for managing the user's two-factor settings:
rails generate controller User
Update app/controllers/users_controller.rb:
    class UsersController < ApplicationController
    def disable_otp
        current_user.otp_required_for_login = false
        current_user.save!
        redirect_to home_index_path
    end

    def enable_otp
        current_user.otp_secret = User.generate_otp_secret
        current_user.otp_required_for_login = true
        current_user.otp_backup_codes = current_user.generate_otp_backup_codes!
        current_user.save!
        redirect_to home_index_path
    end
    end
The show action generates the QR code for users to scan with an authenticator app.
The update action validates the OTP and enables two-factor authentication.
Create a dummy home_controller for index page
Step 6: Create the View for Two-Factor Settings
Edit a view to display the Login information with the integration of MFA. Add the following to app/views/devise/sessions/new.html.erb:
    <h2>Sign in</h2>
    <%= form_for(resource, as: resource_name, url: session_path(resource_name)) do |f| %>
    <div><%= f.label :email %><br />
    <%= f.email_field :email, autofocus: true %></div>

    <div><%= f.label :password %><br />
        <%= f.password_field :password, autocomplete: "off" %></div>

    <div><%= f.label :otp_attempt %><br />
        <%= f.text_field :otp_attempt %> </div>

    <% if devise_mapping.rememberable? -%>
        <div><%= f.check_box :remember_me %> <%= f.label :remember_me %></div>
    <% end -%>

    <div><%= f.submit "Sign in" %></div>
    <% end %>

    <%= render "devise/shared/links" %>
This page allows users to login via TOTP if MFA is enabled by the user or else via password.
Edit a view to display the Registration of username/email information with the integration of MFA. Add the following to app/views/devise/registrations/new.html.erb:
    <h2>Sign up</h2>

    <%= form_for(resource, as: resource_name, url: registration_path(resource_name)) do |f| %>
    <%= devise_error_messages! %>

    <div><%= f.label :email %><br />
    <%= f.email_field :email, autofocus: true %></div>

    <div><%= f.label :password %><br />
        <%= f.password_field :password, autocomplete: "off" %></div>

    <div><%= f.label :password_confirmation %><br />
        <%= f.password_field :password_confirmation, autocomplete: "off" %></div>

    <div><%= f.submit "Sign up" %></div>
    <% end %>

    <%= render "devise/shared/links" %>
This page allows users to register their email/username in Database.
Create a view to display the QR code and enable two-factor authentication. Add the following to app/views/home/index.html.erb:
    <% if !current_user %>
    <%= link_to "Sign up", new_user_registration_path %>
    <%= link_to "Login", new_user_session_path %>
    <% end %>

    <% if current_user %>
    <% if !current_user.otp_required_for_login %>
        <%= button_to "Enable 2FA", users_enable_otp_path, :method => :post %>
    <% end %>

    <% if current_user.otp_required_for_login %>
        <%= button_to "Disable 2FA", users_disable_otp_path, :method => :post %>
        <%= raw RQRCode::render_qrcode(current_user.otp_provisioning_uri(current_user.email, issuer: "<Application-Name>"),
                                    :svg,
                                    :level => :l,
                                    :unit => 2) %>
        <br />
    <% end %>
    <%= link_to "Log out", destroy_user_session_path, :method => :delete %>
    <% end %>
This page allows users to scan the QR code and enter the OTP to enable MFA.
Step 7: Update the Configurations for MFA
Next you need to whitelist :otp_attempt as a permitted parameter in Devise :sign_in controller. You can do this by adding the following to your application_controller.rb:
    # app/controllers/application_controller.rb

    before_action :configure_permitted_parameters, if: :devise_controller?

    protected

    def configure_permitted_parameters
        devise_parameter_sanitizer.permit(:sign_in, keys: [:otp_attempt])
    end
Step 8: Testing the Setup
Register a User: Register a new user using the default Devise registration flow.
Login: Login the user with correct params
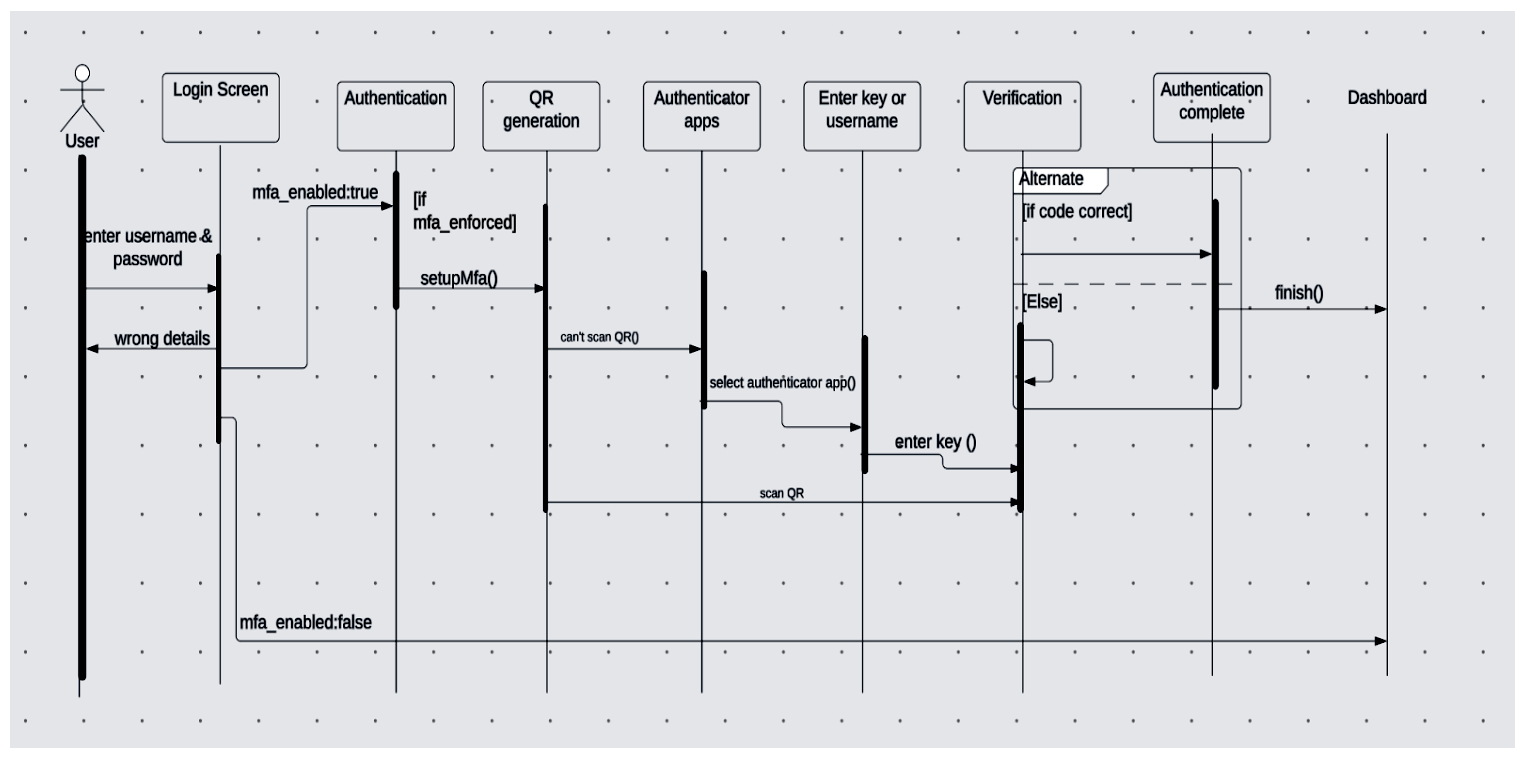
Enable 2FA: Visit /home after logging in to enable MFA.
Logout and Login: Log out and try logging in again, entering your OTP as required.
Securing Your App Further with AI-Based Monitoring
As you implement Multi-Factor Authentication (MFA) in your Ruby on Rails application, it’s crucial to consider additional layers of security to safeguard your users' data. AI-based monitoring systems can significantly enhance your app's security posture by continuously analysing user behaviour, detecting anomalies, and responding to potential threats in real time.
- AI-Powered Adaptive Authentication: Leverage machine learning algorithms to analyse user behaviour patterns and device fingerprints, dynamically adjusting MFA requirements based on risk scores. This approach enhances security while minimising friction for legitimate users, potentially increasing user adoption and satisfaction.
- Biometric MFA Integration with Neural Networks: Implement deep learning models for facial recognition or voice authentication as additional MFA factors. Convolutional Neural Networks (CNNs) and Recurrent Neural Networks (RNNs) can significantly improve the accuracy and speed of biometric verification processes.
- Anomaly Detection Using Unsupervised Learning: Employ clustering algorithms and autoencoders to detect unusual login attempts or suspicious activity patterns. This proactive approach can identify potential security threats before they escalate, providing an additional layer of protection for sensitive data.
- Natural Language Processing for Voice-Based MFA: Integrate advanced NLP techniques to enable voice command-based authentication. By analyzing speech patterns, sentiment, and context, this method can offer a more natural and secure user experience, particularly appealing for hands-free scenarios.
- LLM-Enhanced Security Policies: Harness the power of Large Language Models to dynamically generate and update security policies, adapting to emerging threats and regulatory changes in real-time. This approach not only strengthens your MFA implementation but also aligns with broader enterprise AI strategies, ensuring your authentication system remains at the forefront of technological advancements.
By integrating AI-based monitoring with your MFA setup, you ensure that your application remains vigilant against unauthorised access, providing peace of mind for both you and your users.
Conclusion
In this blog, we explored the essential steps for implementing Multi-Factor Authentication (MFA) in Ruby on Rails using the devise-two-factor gem. We highlighted how MFA significantly enhances user security by requiring a second form of verification, such as One-Time Passwords (OTPs). Additionally, we discussed the integration of AI-based monitoring solutions to detect and respond to potential security threats, further safeguarding your application and users.
Stay informed by checking out more of our insightful blogs on innovative technologies. If you’re ready to bolster your app’s defences, reach out to Bluetick Consultants for personalized advice and solutions tailored to your specific needs. Your users' security is paramount—take action today to protect them effectively!
